Thursday, January 2, 2020

DIY Sweet Orange Rose Bath Bombs


After being in the artsy and crafty business for a few years, we noticed one thing that’s always in trend when the month of giving is near, and that is…bath bombs! So without further ado, here’s our go-to recipe for some uplifting and relaxing Sweet Orange Rose Bath Bombs.
Pssst, we’ve a printable recipe card for this one too, so grab it from down below!
bty
What You’ll Need:
  1. Sodium Bicarbonate
  2. Citric Acid
  3. Epsom Salt
  4. Pink Scrubbing Salt
  5. Jojoba Oil
  6. Calendula Oil
  7. Rose Water
  8. Sweet Orange Essential Oil
  9. Clear Round Plastic Bubble Mold – 6cm each
  10. Big Mixing Bowl
  11. Beaker
  12. Gloves (wear them when mixing the ingredients!)
  13. Digital Scale
  14. Spray Bottle (for spritzing rose water in case the bath bomb mixture isn’t wet enough)
Instructions
  1. In a big mixing bowl, add 230g of Sodium Bicarbonate, 115g of Citric Acid, 60g of Epsom Salt and 55g of Pink Scrubbing Salt.
    bty
    Dry ingredients in the mixing bowl.
  2. Wear gloves and mix the dry ingredients with your hands. Make sure that there are no clumps.
  3. In a beaker, add 10g of Jojoba Oil, 8g of Calendula Oil, 15g of Rose Water and 20 drops of Sweet Orange Essential Oil.
    bty*
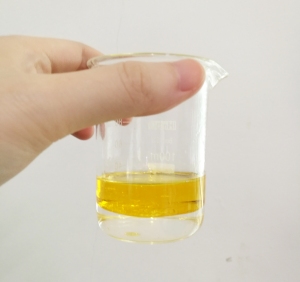
Note: Don’t worry about the oil-water separation in the beaker. It will come together with the dry ingredients in the mixing bowl.
  4. Gradually add the wet ingredients to the dry ingredients in the mixing bowl. Mix thoroughly each time the wet ingredients are added.
    bty
    How it will look when wet ingredients are added.
  5. Check the texture of your bath bomb mixture. Squeeze a handful and if it doesn’t hold its shape, spritz with Rose Water and mix with each spray. The texture should be similar to wet sand.
  6. Fill two halves of the clear round plastic bubble mold and gently close it.
  7. Leave aside for a day so that it can harden completely before removing from mold.
    *Notes:
    a) It’s best to keep bath bombs in an air-tight container so that the oils won’t go rancid fast and the fizziness doesn’t decrease.
    b) These bath bombs are made of natural ingredients and has no additional foaming agents, so it wont bubble as much as other bath bombs that have foaming agents.
Craftiviti Recipe DIY Instructions - Sweet Orange Rose Bath Bombs
let us know, click here!
happy crafting
buy it

Monday, December 16, 2019

7 Christmas Artsy & Crafty Card and Gift Ideas


With the month of giving approaching, we thought of sharing a few artsy and crafty Christmas Gift ideas to help kick start your journey of getting the right presents for the right people 😉

1. Rubber Stamping

how-to-carve-rubber-stamp-dear-handmade-life
Photo from dear handmade life
A craft that can bring calmness to some because of the act of carving rubber to make stamps and the act of stamping itself. It’s easy to create rubber stamps, though be careful when handling blades!
What You’ll Need:
– Rubber Block
– Carving Tools
You can create simple greetings or Christmas elements like reindeer, trees, candy canes and more on rubber blocks. All you need are tracing skills and patience when it comes to the carving 😊

~ * ~

2. Resin Greeting Ornament

christmas ornament and multipurpose resin tray artorias my craftiviti
Photo from Artorias
Epoxy resin is brilliant for creating beautiful and functional pieces. You can coat surfaces or cast something with it. Once hardened, you can write on it with paint markers!
What You’ll Need:
– Clear Epoxy Resin
– Acrylic Paint or Mica Powder
– Something to Pour On/In
(ie: canvas, silicone mold, laser cut wooden key chain)
– Paint Marker
– Plastic Cups
– Popsicle Sticks
– Gloves
Pssst! We’re having a workshop where you can learn how to work with epoxy resin and create your own personalized and unique Christmas Ornament and Multipurpose Tray. Click here to find out more and to join!
~ * ~

3. Decorative Christmas Greeting Pillar Candle

candle-liner-product-5
Photo from Marabu
Marabu Candle liners are prefect for quick doodles or messages on candles. All you need is just one or two (or more) of those candle liners and a candle to work on, and you’re good to go!
What You’ll Need:
– Marabu Candle Liner (we have a few in store, so you can get it from us too!)
– Candle
k06009_marabu_010100033
~ * ~

4. Yellow Craft Box

Yellow Craft Box YCB Craftiviti beaded candle kit
Your complete craft project in one box! The Yellow Craft Box is perfect for kids and beginners as well. Our current range of Yellow Craft Boxes includes a soap making kit, an easy no-flame (except for when you light it up at the end) candle making kit, and a name stone kit 😍
What You’ll Need:
– Yellow Craft Box
You can use one of these kits to make a bunch of Christmas gifts for your loved ones, or simply gift the entire kit itself to your artsy and crafty friends!
~ * ~

5. Colorpy Kit

Colorpy utilizes the concept of water/paper marbling where patterns are drawn using pigments on a liquid before being transferred to an absorbent surface, such as paper or fabric. These series of kid- and beginner- friendly kits allows anyone to craft to their heart’s desire and transfer gorgeous patterns on just about any medium.
What You’ll Need:
– Colorpy Kit (comes with 6 Bottles of color (30g each), a Bottle of Magic Agent (200g), 10 Sheets of Card Paper, a Magic Wand and a A5 Tray)
You can use one of these kits to make a bunch of Christmas cards, scarves, rock paper weights and more for your loved ones. Or, you can gift the entire kit as well!
~ * ~

6. Botanical Wax Sachets

bty
Not only wax sachets are pretty little tablets you can leave near a sunny spot in your room for some gentle fragrance release, they can also double as Christmas ornaments (and make awesome gifts)!
What You’ll Need:
– Natural Pillar Soywax
– Dried Rose Buds
– Dried Amaranth Globe Flowers
– Essential Oils or Fragrance Oils
– 
Wax Sachet Silicone Molds like these 30g molds
~ * ~

7. DIY Leather Craft Kits

DIY leather craft kits craftiviti
Know someone with an appreciation for leather products? You can get these beginner-friendly DIY Leather Craft Kits and make one for them, or simply gift the entire DIY Leather Craft Kit to them!
What You’ll Need:
– DIY Leather Craft Kit (comes with pre-punched leather parts, instruction manual, a stitching manual, thread & needles, and a leather care guide).

happy craftingbuy it

Friday, December 6, 2019

Simple Epoxy Resin Abstract Fluid Art DIY


Epoxy resin is a brilliant medium that’s lustrous like glass but with a composition like plastic. It pairs form with functionality, resulting in endless artistic possibilities like fairy pendants, seascape art, and wood river tables. It’s experimental nature and ethereal aesthetic allows for gorgeous results 😍
For today’s post, we’re going to share a simple epoxy resin abstract fluid art DIY.
bty
What You’ll Need:
  1. Clear Epoxy Resin and Hardener
  2. Acrylic Paints 👉 We used these paints by Mont Marte
  3. Plastic Cups or Beakers
  4. Silicone Mat
  5. Popsicle Sticks
  6. Non-Powdered Latex Gloves
  7. Handheld Blowtorch
  8. Canvas
Instructions
  1. On top of a silicone mat, place your canvas on plastic cups to elevate it. Make sure that the canvas is level to ensure a smooth and balanced surface for the resin to be poured on.
    bty
  2. Choose three colours of acrylic paints and set them aside with one popsicle stick and one plastic cup/beaker for each colour.bdr
  3. While wearing non-powdered latex gloves, carefully mix two parts of Craftiviti Clear Epoxy Resin with one part Craftiviti Clear Resin Hardener (Eg: 60ml of Craftiviti Clear Epoxy Resin + 30ml of Craftiviti Clear Resin Hardener). Mixing too fast will introduce a lot of bubbles into the mixture so make sure not to do that!
    *Note: The Pot Life of Craftiviti’s Clear Epoxy Resin and Hardener is 20 minutes. This means, you have 20 minutes to work with it after you’ve mixed the two parts.
  4. Separate the resin mixture into three different plastic cups.
  5. Add no more than 5% of acrylic paint to each cup of resin.
    (Eg: 30ml of resin will need up to 1.5ml of acrylic paint)
  6. Stir well to ensure that the acrylic paint mixes thoroughly with the resin. If not, you’ll end up with lumps!
  7. Pour the coloured resin on your canvas. Go wild, make sure to cover the entire surface!
    bdr*Note: You can move the canvas around to make the resin shift. Or, you can use a hand-held heatgun as well.
  8. Use a blowtorch to pop the bubbles on the resin. Be careful not to burn your resin and your canvas.
  9. Cover your art so that dust or other particles doesn’t settle on it as it cures.
  10. Leave aside for 24-48 hours. Once fully cured, you can display your resin artwork.
bty

happy craftingbuy it

Thursday, November 7, 2019

Our Top 3 Uses for Lemon Essential Oil


If you think about a smell that’s commonly associated with cleanliness and pleasantness,  the first one that pops into your mind would most probably be lemon or other citrus scents. Just smelling citrus can be refreshing, but that’s not all to it.
For today’s post, we’ll be focusing on Lemon Essential Oil, whose scent can perk you up. It’s purported to have powerful anti-microbial activity, and it can disinfect surfaces. Some also swear that it can help improve the condition of your skin, reduce excess sebum production, and eliminate dandruff! With so many uses for this amazing essential oil, it can be a little overwhelming for those who don’t know where or how to start using it. So, here’s our Top 3 uses for it!
craftiviti lemon essential oil yein and young
1. Air Freshener
Don’t have good ventilation at home? Dislike the smell of cooking/food permeating your space after you’re done eating, or simply want to freshen up spaces that feel stuffy/has stale air? You can add up to 20 drops of lemon essential oil to 18ml of water in a 20ml Amber Spray Bottle and give it a good shake before spraying the area.
Pssst! All citrus-type essential oils are photosensitive. It’s best to keep them in amber glass bottles to protect them from UV light, and also because they break down plastic bottles.
If you’re not a fan of multiple shakes before using this spray, you can add in Polysorbate-20 (an emulsifier which is used to bring small amounts of oils into a watery environment). The amount of Polysorbate-20 that you’ll need to add is equivalent to the amount of lemon essential oil added. So…
With Polysorbate-20
20 drops of Lemon Essential Oil + 20 drops of Polysorbate-20 + 18ml of Water
Without Polysorbate-20
20 drops of Lemon Essential Oil + 18ml of Water
51
2. Facial Oil
Anti-inflammatory, antioxidant, detoxicant, and balancing is just a few of the properties and benefits lemon essential oil has for the skin. By adding 12 drops of lemon essential oil to 30ml of jojoba oil + sweet almond oil, you’ll get a moisturizing, skin balancing, detoxing and relieving, anti-inflammatory and antioxidant facial oil. All you need is a amber bottle with a dropper cap to store this facial oil.
Pssst! This works as a body and hair oil too! When applying to your hair, use it as a hair oil mask. Leave it in your hair for a minimum of 15 minutes before shampooing and rinsing.
12 drops of Lemon Essential Oil + 15ml of Jojoba Oil + 15ml of Sweet Almond Oil
*Note: If this oil is too ‘heavy’ for you, you can reduce the amount of jojoba oil and increase the amount of sweet almond oil instead.
Fresh lemon with lemon essential oil on white background.
3. Insect Repellent
Thanks to the tropical weather we experience in Malaysia, there’s an abundance of bugs and lizards everywhere and not many of us are fans of them. Add 10 drops of lemon essential oil, 15 drops of tea tree essential oil or eucalyptus essential oil and a pinch of menthol crystals to some refined coconut oil in a wall burner. Allow the scent to envelop your room and you’ll have a pretty efficient insect repellent that also has other aromatherapeutic benefits like clearing blocked noses and boosting your mood!
10 drops of Lemon Essential Oil + 15 drops of Tea Tree / Eucalyptus Essential Oil
+ a pinch of Menthol Crystals + Refined Coconut Oil
happy craftingbuy it

JOIN US ON FACEBOOK